
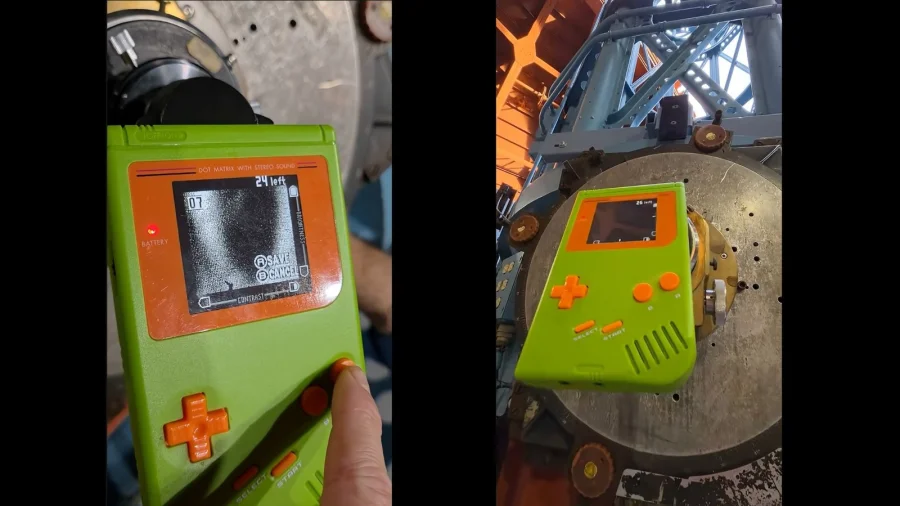
An astrophysicist who turned a 1998 Nintendo Game Boy Camera into an unlikely tool for space photography has just released the DIY blueprint for his experiment. Alexander Pietrow, the man behind the viral image of Jupiter captured in 128×128 pixel grayscale, published a step-by-step tutorial this week — and it’s exactly as delightfully absurd as it sounds.
The 2-bit space photo that broke the internet
Earlier this year, Pietrow attached a vintage Game Boy Camera — a low-resolution accessory released in 1998 — to a 125-year-old refracting telescope at the Archenhold Observatory in Berlin. The result: a pixelated, ghostly image of Jupiter’s cloud bands, captured in just 2 bits of color depth. The photo went viral, not because it rivaled the James Webb Space Telescope, but because it proved that curiosity and ingenuity can outshine expensive gear.
Why the DIY tutorial matters for retro tech fans
Pietrow’s newly published guide isn’t just a novelty. It’s a detailed walkthrough covering the hardware hack, the optical alignment, and the software needed to extract images from the Game Boy Camera’s cartridge. For retro-tech enthusiasts, it’s a rare bridge between childhood nostalgia and real scientific observation. “I wanted to show that you don’t need a million-dollar setup to enjoy astronomy,” Pietrow told Popular Science in an earlier interview.
How the experiment actually worked
The Game Boy Camera, originally designed for pixel art and low-res selfies, captures images at a resolution of 128×128 pixels in four shades of gray. Pietrow mounted the camera’s lens directly over the telescope’s eyepiece, using a custom 3D-printed adapter. The telescope itself — a historic 21-meter-long refractor built in 1896 — provided the magnification. The combination produced a raw image that Pietrow then processed using open-source software to reveal Jupiter’s bands.
Who is Alexander Pietrow?
Pietrow is a postdoctoral researcher at the Leibniz Institute for Astrophysics Potsdam, specializing in solar physics. His day job involves studying the Sun using professional instruments. The Game Boy project was a side experiment born from a simple question: “What would happen if I pointed this at Jupiter?” The answer, it turns out, was a viral sensation and now a teachable moment for DIY science.
What the tutorial includes — and who it’s for
The guide covers everything from sourcing a working Game Boy Camera and cartridge to building the adapter and aligning the telescope. It assumes basic familiarity with soldering and 3D printing, but Pietrow includes links to pre-made parts for beginners. The software section explains how to dump the camera’s internal memory using an Arduino and convert the raw data into viewable images. It’s designed for hobbyists, not professional astronomers — though Pietrow notes that even seasoned scientists have reached out with questions.
Confirmed facts vs. what remains unclear
Confirmed: Pietrow used a standard Game Boy Camera, a 125-year-old refractor telescope, and a custom 3D-printed mount. The image was captured in 2025 and processed with open-source tools. The tutorial is now publicly available on his website. Unclear: Whether the same technique can work with smaller telescopes or other vintage cameras. Pietrow has not tested those variations, though he encourages others to try.
Why this matters beyond the novelty
The project is a reminder that scientific discovery doesn’t always require cutting-edge technology. It also highlights the growing community of “retro-tech astronomers” who repurpose old hardware — from floppy disk drives to VHS cameras — for space observation. Pietrow’s tutorial lowers the barrier for entry, potentially inspiring a new generation of hobbyists who grew up with Game Boys but never imagined pointing one at the sky.
Risks and limitations of the approach
The technique has clear drawbacks. The Game Boy Camera’s low resolution and lack of color make it unsuitable for detailed scientific analysis. The setup also requires a large telescope — Pietrow used a 21-meter refractor — which most hobbyists don’t have access to. However, he notes that smaller telescopes can still produce recognizable images of the Moon, if not Jupiter. The tutorial is more about the spirit of experimentation than producing publishable data.
The wider trend: retro tech meets modern science
Pietrow’s project is part of a broader movement where vintage electronics are repurposed for scientific use. From Commodore 64s controlling weather stations to Game Boys monitoring radiation levels, hobbyists are proving that old hardware still has life. The trend reflects a cultural shift toward sustainability and tinkering — values that resonate strongly with Indian audiences who grew up with affordable, repairable electronics.
What you can do if you want to try this at home
Start with a working Game Boy Camera and a cartridge. You’ll need a 3D printer or access to one for the adapter. For the telescope, even a modest 8-inch reflector can capture the Moon. Pietrow’s guide includes links to open-source software for image extraction. If you don’t have a telescope, consider joining a local astronomy club — many have public viewing nights where you can test the setup.
What’s next for Pietrow and the Game Boy Camera
Pietrow has hinted at future experiments, including attempts to photograph Saturn’s rings and the Orion Nebula using the same setup. He’s also considering a version of the tutorial for the Game Boy Advance Camera, which offers slightly higher resolution. For now, the guide stands as a testament to the idea that the best science sometimes starts with a silly question.
Our Take
Pietrow’s DIY tutorial is more than a how-to guide — it’s a philosophy. In an age where astronomy is dominated by billion-dollar telescopes and AI-processed images, this project reminds us that wonder doesn’t require a budget. It’s also a quiet critique of consumerism: the idea that we need the latest gear to explore the universe. For Indian readers, where resourcefulness and repair culture are deeply ingrained, this story resonates on a practical level. The tutorial is worth bookmarking, even if you never build the adapter. It’s a blueprint for curiosity.
Frequently Asked Questions
Can I use a regular Game Boy Camera for astrophotography?
Yes, but you’ll need a telescope and a custom adapter. The camera alone cannot capture distant objects without magnification.
Do I need a 125-year-old telescope to replicate this?
No. Pietrow used a historic telescope for the viral image, but his tutorial works with modern amateur telescopes as well, especially for the Moon.
Is the DIY tutorial free?
Yes. Pietrow published the guide on his personal website and social media channels at no cost. It includes links to open-source software and 3D-printable files.
What can I actually see with a Game Boy Camera through a telescope?
The Moon is the easiest target. Jupiter appears as a small, pixelated disk with visible cloud bands. Saturn may show its rings, but details will be limited.